How to Setup and use Logitech G Hub (easy guide)
2023-01-04 19:48:05
Hey there! In this comprehensive guide, I will walk you through the step-by-step process of getting Logitech G Hub up and running, from installation to customization.
What Is Logitech G Hub and What Does It Do?
Logitech G Hub is a program that allows you to customize your Logitech gaming things, such as mice, keyboards, and headsets. With G Hub, you can create and assign macro commands, customize lighting effects, dynamic equalizers, and microphone equalizers, and adjust the sensitivity of your devices.
Speaking of lighting, G Hub takes RGB control to a whole new level. I can personalize the lighting on my Logitech devices, syncing dynamic effects for a truly immersive gaming atmosphere.
But it's not just about looks. G Hub keeps my gear updated with firmware updates, ensuring they always perform at their best.
Plus, it lets me watch in-game stats and system performance, helping me track my progress and stay on top of my game.
Are you having trouble setting up your Logitech G Hub?
No worries, I've got you covered with this easy guide.
How to install Logitech G Hub
How to install Logitech G Hub on your PC:
Follow these simple steps to ensure a smooth installation process and enjoy personalized customization options for your gaming gear.
- Visit the [Logitech website](https://www.logitechg.com/en-us/innovation/g-hub.html).
- Download the G Hub installation file from the website.
- Locate the downloaded file and double-click it to launch the installer.
- Follow the on-screen instructions provided by the installer.
- Complete the installation process as guided by the prompts.
How to install G Hub on your Mac:
- Download the G Hub installation file from the [Logitech website](https://www.logitechg.com/en-us/innovation/g-hub.html).
- Double-click on the downloaded file to mount the disk image.
- In the opened disk image, locate the G Hub icon.
- Drag the G Hub icon into the "Applications" folder.
- Find and launch G Hub from the "Applications" folder on your Mac.
How to Connect Logitech Mouse to G Hub
To connect my Logitech mouse to Logitech G Hub for customization and performance tuning, I follow these steps:
- **Download and Install G Hub:** If I haven't already, I start by downloading and installing Logitech G Hub from the Logitech website.
- **Open G Hub: **Once G Hub is installed, I launch the application. It may take a moment to initialize.
- **Log In or Create an Account:** If prompted, I log in with my Logitech account. If I don't have one, I create an account. This step ensures my settings are synced across devices.
- **Connect the Mouse: **I connect my Logitech mouse to my computer using the provided USB cable or via wireless connectivity if it's a wireless mouse. Ensure the mouse is powered on.
- **Detection and Configuration:** G Hub should automatically detect the connected mouse. If not, I click on the "Add New Device" button within G Hub and select my mouse model from the list.
- **Customize Settings: **With the mouse successfully connected, I can now customize various settings such as DPI levels, button assignments, and RGB lighting effects to tailor the mouse to my preferences.
- **Save Profiles:** I create and save profiles within G Hub, assigning specific settings to different games or tasks.
- **Firmware Updates:** Periodically, I check for firmware updates within G Hub to ensure my mouse is running the latest software for optimal performance.
How to Use G Hub for Seamless Experience?
Logitech G Hub elevates my gaming and productivity experiences by providing a centralized platform for customizing, managing, and optimizing my Logitech devices. It's an essential tool for any Logitech gear enthusiast, ensuring a seamless and tailored user experience.
Customizing My Devices
I start by customizing my Logitech gaming peripherals using Logitech G Hub. Whether it's my mouse, keyboard, or headset, I can fine-tune settings to match my gaming style. I create different profiles for various games, adjusting DPI levels, keybindings, and lighting effects.
Syncing RGB Lighting
With G Hub, I ensure all my Logitech devices have synchronized RGB lighting. This creates an immersive gaming atmosphere and adds a personalized touch to my setup. I can choose from a variety of lighting effects or even create my own.
Creating Macros
For complex in-game actions or productivity tasks, I use G Hub to create macros. These are sequences of commands assigned to a single button press, saving me time and effort. Whether it's executing a combo move in a game or automating tasks, macros are incredibly handy.
Managing Profiles
To keep things organized, I manage profiles within G Hub. I assign specific profiles to different games or applications, ensuring that my settings are always optimized. Switching between profiles is seamless, thanks to G Hub's intuitive interface.
Monitoring In-Game Stats
G Hub provides a convenient way to monitor in-game stats and system performance. During gameplay, I can check on critical metrics like CPU and GPU usage, FPS, and network performance. This information helps me fine-tune my gaming rig for the best experience.
Firmware Updates
I regularly check for firmware updates within G Hub to keep my devices up-to-date. This ensures that my Logitech gear is running smoothly and benefits from any enhancements or bug fixes released by Logitech.
Integration with Other Apps
G Hub's seamless integration with popular applications like OBS Studio and Discord significantly enhances my streaming and communication experiences.
With G Hub, I can conveniently manage streaming overlays, fine-tune audio settings, and even receive chat notifications, all within a single interface. This integration streamlines my workflow, making it easier to focus on creating content and engaging with my audience.
Syncing Across Devices
As someone who often switches between a desktop and a laptop for gaming and productivity, this feature ensures that my customized settings and profiles are consistent, regardless of which computer I'm using. It's a time-saving and convenience-enhancing feature that truly sets G Hub apart.
FAQ about Logitech G-Hub
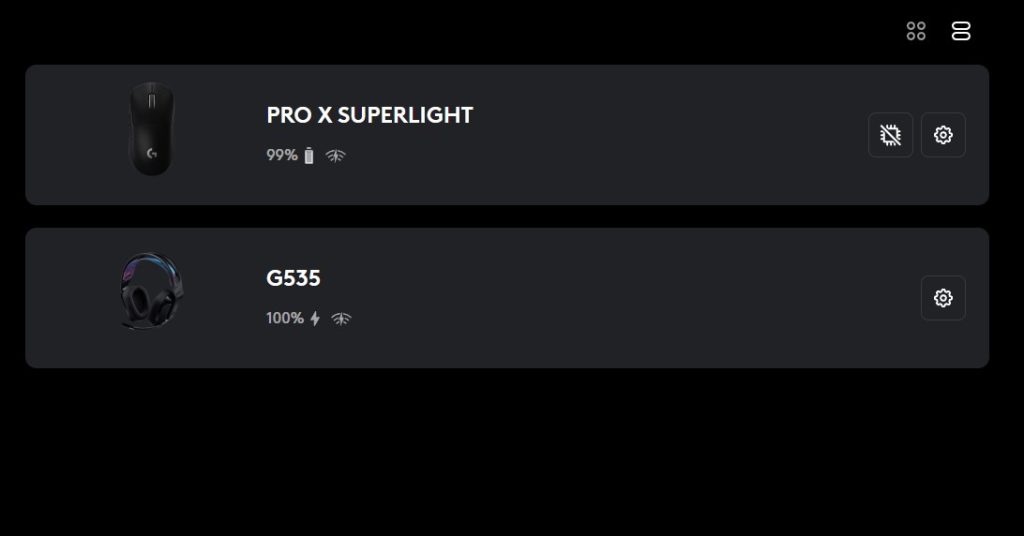
How to make sure your mouse is recognized by G Hub?:
- To ensure that your mouse is recognized by Logitech G Hub, follow these simple steps:
- Connect your mouse to your computer using a USB cable.
- Launch Logitech G Hub, ensuring it's up and running.
- Navigate to the "Devices" tab located in the top menu of G Hub.
- Look for your mouse listed under the "Connected Devices" section. It should be displayed here.
- In case your mouse isn't appearing in the list, don't worry. Simply click the "Refresh" button within G Hub. This action triggers a scan for new devices and should prompt your mouse to show up.
How to Change Where Logitech G Hub Is Insallted?
To change the installation location of Logitech G Hub, follow these steps:
- **Uninstall G Hub (if necessary):** If you've already installed G Hub in its default location and want to change it, start by uninstalling the program. You can do this through the Windows "Apps & Features" or macOS "Applications" settings.
- **Download the Installer:** Visit the Logitech website and download the G Hub installer again.
- **Custom Installation:** During the installation process, you will come across an option to choose the installation directory. Click on the "Custom" or "Advanced" installation option, which will allow you to specify the installation path.
- **Choose Installation Path:** Select a new directory where you want G Hub to be installed. You can either browse and select an existing folder or create a new one.
- **Complete Installation:** Follow the on-screen instructions to finish the installation. G Hub will now be installed in the directory you specified.
You can also try this method if you don’t want to reinstall it all over again:
- Move the G Hub folder from its default location (usually "C:\Program Files" or "C:\Program Files (x86)") to your desired installation location or drive.
- Open Command Prompt as an administrator.
- Use the mklink command to create a symbolic link that points from the default installation folder to the new location. For example,
mklink /J "C:\Program Files\Logitech\G Hub" "D:\YourDesiredLocation\G Hub
- Make sure to replace "D:\YourDesiredLocation\G Hub" with the actual path where you moved the G Hub folder.
- Open G Hub, and it should work as if it's installed in the new location.
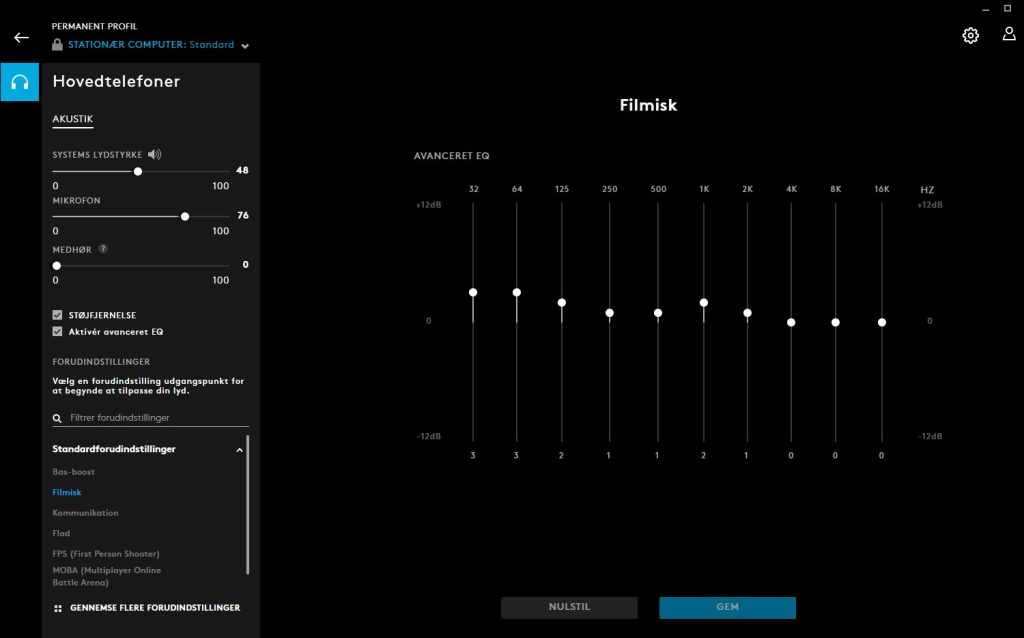
How To access the G Hub settings?:
- Launch Logitech G Hub.
- Click on the "Settings" icon in the top right corner of the window.
This will open the G Hub settings menu, where you can adjust various options such as language, update preferences, and more.
Do you need an internet connection to use G Hub?
No, as long as you have already installed it on your computer, you don't need an internet connection to use G Hub.
Some features of G Hub **may require **an internet connection to function, such as checking for updates or accessing online support resources. **Yoou also need internet to install**
So, do you need Logitech G Hub?
It depends on your specific needs and preferences.
If you have a Logitech gaming peripheral and want to customize its functionality, G Hub can be a great tool to use.
**It's especially useful for adjusting equalizer and microphone settings. **
If you don't have a Logitech gaming device or don't need to customize its settings, you don't need G Hub at all.
I hope this guide has helped set up and use Logitech G Hub. If you have any further questions or need additional assistance, don't hesitate to ask.
I wrote this because I love Logitech Gaming items. I use headsets, keyboard, and mouse from Logitech - though the keyboard I use is not a gaming keyboard - it is logitech mx keys.